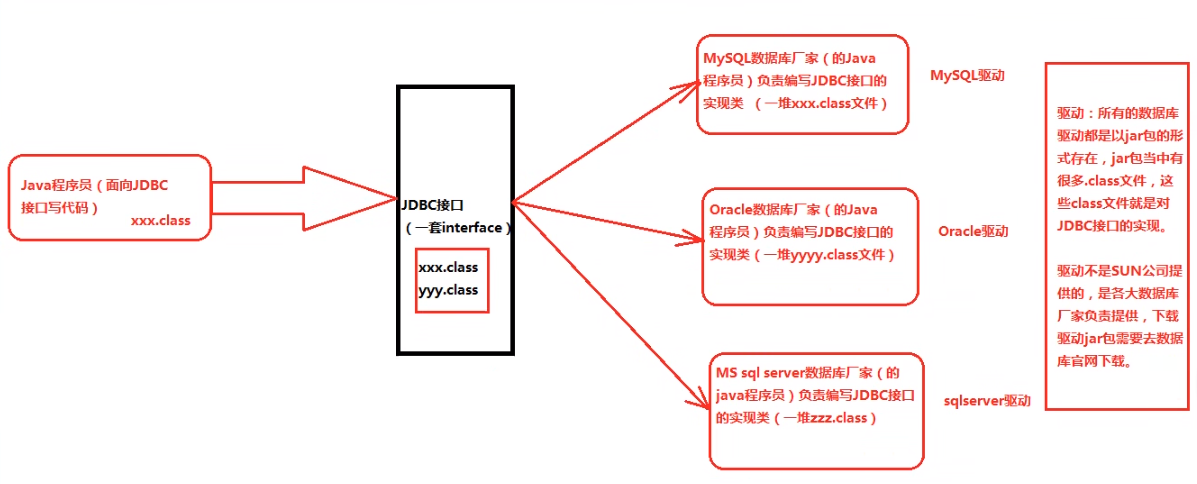
JDBC
Java DataBase Connectivity(Java 语言连接数据库)
本质是 SUN 公司制定的一套接口
java.sql.*
Before Start
从官网下载对应的驱动 jar 包,然后配置到环境变量 classpath 中
将 jar 包存在自定的 tool 文件,其中 ;. 代表当前目录所有文件
1
| .;C:\vv\code\Java\Tool\mysql-connector-java-5.1.23.jar
|
- 以上配置是针对文本编辑器开发,使用 IDEA 不需要配置以上环境变量(直接导入 jar 包即可)
Six Step
- 注册驱动(告诉 Java 程序,即将连接的是哪一种数据库)
- 获取连接(打开 JVM 进程与数据库进程之间的通道)
- 获取数据库操作对象(专门执行 SQL 语句的对象)
- 执行 SQL 语句(DQL DML 等)
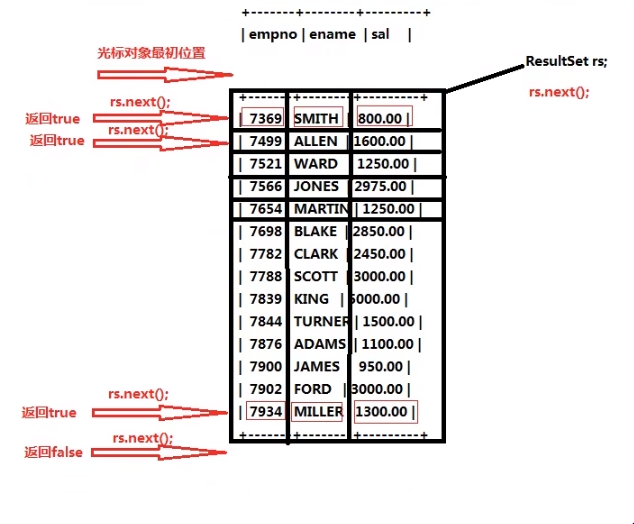
- 处理查询结果集(只有第四步执行的是 DQL 时才有查询结果)
- 释放资源(使用完需关闭进程)
通过 Java 执行 insert 语句:
1
2
3
4
5
6
7
8
9
10
11
12
13
14
15
16
17
18
19
20
21
22
23
24
25
26
27
28
29
30
31
32
33
34
35
36
37
38
39
40
41
42
43
44
45
46
47
48
49
50
51
52
53
54
55
56
57
58
59
60
61
62
63
64
65
66
67
68
69
70
71
72
73
| package io.wataaaame.github.jdbc;
import java.sql.*;
public class JDBCTest01 {
public static void main(String[] args) {
Connection conn = null;
Statement stmt = null;
try {
Driver driver = new com.mysql.jdbc.Driver();
DriverManager.registerDriver(driver);
String url = "jdbc:mysql://127.0.0.1:3306/learning";
String user = "root";
String psw = "0.0";
conn = DriverManager.getConnection(url, user, psw);
stmt = conn.createStatement();
String sql = "insert into emp1(empno, ename) values(101, 'vv')";
int count = stmt.executeUpdate(sql);
System.out.println(count == 1 ? "success" : "false");
} catch (SQLException e) {
e.printStackTrace();
} finally {
if (stmt != null) {
try {
stmt.close();
} catch (SQLException e) {
e.printStackTrace();
}
}
if (conn != null) {
try {
conn.close();
} catch (SQLException e) {
e.printStackTrace();
}
}
}
}
}
|
注册驱动的另一种方式(常用):
1
2
3
4
5
6
7
8
9
10
11
12
13
14
15
16
17
18
19
20
21
22
23
24
25
26
27
28
29
30
31
32
33
34
35
36
37
| package io.wataaaame.github.jdbc;
import java.sql.Connection;
import java.sql.DriverManager;
import java.sql.SQLException;
public class JDBCTest03 {
public static void main(String[] args) {
Connection conn = null;
try {
Class.forName("com.mysql.jdbc.Driver");
conn = DriverManager.getConnection("jdbc:mysql://localhost:3306/learning", "root", "0.0");
System.out.println(conn);
} catch (SQLException e) {
e.printStackTrace();
} catch (ClassNotFoundException e) {
e.printStackTrace();
} finally {
if (conn != null) {
try {
conn.close();
} catch (SQLException e) {
e.printStackTrace();
}
}
}
}
}
|
将连接数据库的所有信息配置到配置文件中:
1
2
3
4
5
6
7
8
9
10
11
12
13
14
15
16
17
18
19
20
21
22
23
24
25
26
27
28
29
30
31
32
33
34
35
36
37
38
39
40
41
42
43
44
45
46
47
48
49
50
51
52
53
54
55
56
57
58
| package io.wataaaame.github.jdbc;
import java.sql.Connection;
import java.sql.DriverManager;
import java.sql.SQLException;
import java.sql.Statement;
import java.util.ResourceBundle;
public class JDBCTest04 {
public static void main(String[] args) {
ResourceBundle bundle = ResourceBundle.getBundle("jdbc");
String driver = bundle.getString("driver");
String url = bundle.getString("url");
String user = bundle.getString("user");
String password = bundle.getString("password");
Connection conn = null;
Statement stmt = null;
try {
Class.forName(driver);
conn = DriverManager.getConnection(url, user, password);
stmt = conn.createStatement();
String sql = "insert into emp1(empno, ename) values(101, 'vv')";
int count = stmt.executeUpdate(sql);
System.out.println(count == 1 ? "completed" : "fail");
} catch (ClassNotFoundException e) {
e.printStackTrace();
} catch (SQLException e) {
e.printStackTrace();
} finally {
if (stmt != null) {
try {
stmt.close();
} catch (SQLException e) {
e.printStackTrace();
}
}
if (conn != null) {
try {
conn.close();
} catch (SQLException e) {
e.printStackTrace();
}
}
}
}
}
|
处理查询结果集:
1
2
3
4
5
6
7
8
9
10
11
12
13
14
15
16
17
18
19
20
21
22
23
24
25
26
27
28
29
30
31
32
33
34
35
36
37
38
39
40
41
42
43
44
45
46
47
48
49
50
51
52
53
54
55
56
57
58
59
60
61
62
63
64
65
66
67
68
69
70
71
72
73
74
75
76
77
78
| package io.wataaaame.github.jdbc;
import java.sql.*;
import java.util.ResourceBundle;
public class JDBCTest05 {
public static void main(String[] args) {
ResourceBundle bundle = ResourceBundle.getBundle("jdbc");
String driver = bundle.getString("driver");
String url = bundle.getString("url");
String user = bundle.getString("user");
String password = bundle.getString("password");
Connection conn = null;
Statement stmt = null;
ResultSet rs = null;
try {
Class.forName(driver);
conn = DriverManager.getConnection(url, user, password);
stmt = conn.createStatement();
String sql = "select empno, ename, sal from emp";
rs = stmt.executeQuery(sql);
while (rs.next()) {
System.out.println(rs.getString("empno") + ", " +
rs.getString("ename") + ", " +
rs.getString("sal"));
}
} catch (ClassNotFoundException e) {
e.printStackTrace();
} catch (SQLException e) {
e.printStackTrace();
} finally {
if (rs != null) {
try {
rs.close();
} catch (SQLException e) {
e.printStackTrace();
}
}
if (stmt != null) {
try {
stmt.close();
} catch (SQLException e) {
e.printStackTrace();
}
}
if (conn != null) {
try {
conn.close();
} catch (SQLException e) {
e.printStackTrace();
}
}
}
}
}
|
Use IDEA
Module 右键 -> Open Module Settings -> Project Setting -> Libraries -> + -> Java -> [path]/mysql-connector-java-5.1.23.jar -> choose Module
Power Designer
使用 PD 工具来进行数据库表的设计
实现功能
模拟用户登录功能的实现
业务描述:
程序运行的时候,提供一个输入的入口,可以让用户输入用户名和密码
用户输入用户名和密码之后,提交信息,Java 程序收集到用户信息
Java 程序连接数据库验证用户名和密码是否合法
合法:显示登录成功
不合法:显示登录失败
代码如下:
1
2
3
4
5
6
7
8
9
10
11
12
13
14
15
16
17
18
19
20
21
22
23
24
25
26
27
28
29
30
31
32
33
34
35
36
37
38
39
40
41
42
43
44
45
46
47
48
49
50
51
52
53
54
55
56
57
58
59
60
61
62
63
64
65
66
67
68
69
70
71
72
73
74
75
76
77
78
79
80
81
82
83
84
85
86
87
88
89
90
91
92
93
94
95
96
97
98
99
100
101
102
103
104
105
106
107
108
109
110
111
| package io.wataaaame.github.jdbc;
import java.sql.*;
import java.util.HashMap;
import java.util.Map;
import java.util.ResourceBundle;
import java.util.Scanner;
public class JDBCTest06 {
public static void main(String[] args) {
Map<String, String> userLoginInfo = initUI();
boolean isLogin = login(userLoginInfo);
System.out.println(isLogin == true ? "success" : "fail");
}
private static boolean login(Map<String, String> userLoginInfo) {
ResourceBundle bundle = ResourceBundle.getBundle("jdbc");
String driver = bundle.getString("driver");
String url = bundle.getString("url");
String user = bundle.getString("user");
String password = bundle.getString("password");
Connection conn = null;
Statement stmt = null;
ResultSet rs = null;
String loginName = userLoginInfo.get("loginName");
String loginPwd = userLoginInfo.get("loginPwd");
boolean isLogin = false;
try {
Class.forName(driver);
conn = DriverManager.getConnection(url, user, password);
stmt = conn.createStatement();
String sql = "select * from t_user where loginName = '" + loginName + "' and loginPwd = '" + loginPwd + "'";
rs = stmt.executeQuery(sql);
if (rs.next()) {
isLogin = true;
}
} catch (ClassNotFoundException e) {
e.printStackTrace();
} catch (SQLException e) {
e.printStackTrace();
} finally {
if (rs != null) {
try {
rs.close();
} catch (SQLException e) {
e.printStackTrace();
}
}
if (stmt != null) {
try {
stmt.close();
} catch (SQLException e) {
e.printStackTrace();
}
}
if (conn != null) {
try {
conn.close();
} catch (SQLException e) {
e.printStackTrace();
}
}
}
return isLogin;
}
private static Map<String, String> initUI() {
Scanner s = new Scanner(System.in);
System.out.print("username: ");
String loginName = s.nextLine();
System.out.print("password: ");
String loginPwd = s.nextLine();
Map<String, String> userLoginInfo = new HashMap<>();
userLoginInfo.put("loginName", loginName);
userLoginInfo.put("loginPwd", loginPwd);
return userLoginInfo;
}
}
|
SQL 注入
当前程序存在的问题:
这种现象被称为 “SQL 注入”(黑客经常使用)
- 用户输入的信息中含有 sql 语句的关键字,并且这些关键字参与 sql 语句的编译过程,导致 sql 语句的原意被扭曲
1
2
3
4
5
| String sql = "select * from t_user where loginName = '" + loginName + "' and loginPwd = '" + loginPwd + "'";
rs = stmt.executeQuery(sql);
|
解决 SQL 注入问题
用户提供的信息不参与 SQL 语句的编译过程
java.sql.PreparedStatement
- 该接口继承
java.sql.Statement
- 该对象属于预编译的数据库操作对象
- 原理是:预先对 SQL 语句的框架进行编译,然后再给 SQL 语句传值
代码如下:
1
2
3
4
5
6
7
8
9
10
11
12
13
14
15
16
17
18
19
20
21
22
23
24
25
26
27
28
29
30
31
32
33
34
35
36
37
38
39
40
41
42
43
44
45
46
47
48
49
50
51
52
53
54
55
56
57
58
59
60
61
62
63
64
65
66
67
68
69
70
71
72
73
74
75
76
77
78
79
80
81
82
83
84
85
86
87
88
89
90
91
92
93
94
95
96
97
98
99
100
101
102
103
104
105
106
107
| package io.wataaaame.github.jdbc;
import java.sql.*;
import java.util.HashMap;
import java.util.Map;
import java.util.ResourceBundle;
import java.util.Scanner;
public class JDBCTest07 {
public static void main(String[] args) {
Map<String, String> userLoginInfo = initUI();
boolean isLogin = login(userLoginInfo);
System.out.println(isLogin == true ? "success" : "fail");
}
private static boolean login(Map<String, String> userLoginInfo) {
ResourceBundle bundle = ResourceBundle.getBundle("jdbc");
String driver = bundle.getString("driver");
String url = bundle.getString("url");
String user = bundle.getString("user");
String password = bundle.getString("password");
Connection conn = null;
PreparedStatement ps = null;
ResultSet rs = null;
String loginName = userLoginInfo.get("loginName");
String loginPwd = userLoginInfo.get("loginPwd");
boolean isLogin = false;
try {
Class.forName(driver);
conn = DriverManager.getConnection(url, user, password);
String sql = "select * from t_user where loginName = ? and loginPwd = ?";
ps = conn.prepareStatement(sql);
ps.setString(1, loginName);
ps.setString(2, loginPwd);
rs = ps.executeQuery();
if (rs.next()) {
isLogin = true;
}
} catch (ClassNotFoundException e) {
e.printStackTrace();
} catch (SQLException e) {
e.printStackTrace();
} finally {
if (rs != null) {
try {
rs.close();
} catch (SQLException e) {
e.printStackTrace();
}
}
if (ps != null) {
try {
ps.close();
} catch (SQLException e) {
e.printStackTrace();
}
}
if (conn != null) {
try {
conn.close();
} catch (SQLException e) {
e.printStackTrace();
}
}
}
return isLogin;
}
private static Map<String, String> initUI() {
Scanner s = new Scanner(System.in);
System.out.print("username: ");
String loginName = s.nextLine();
System.out.print("password: ");
String loginPwd = s.nextLine();
Map<String, String> userLoginInfo = new HashMap<>();
userLoginInfo.put("loginName", loginName);
userLoginInfo.put("loginPwd", loginPwd);
return userLoginInfo;
}
}
|
Statement 与 PreparedStatement 对比
|
Statement |
PreparedStatement |
| SQL 注入问题 |
存在 |
不存在 |
| 编译运行 |
编译一次运行一次 |
编译一次运行多次(预先编译) |
| 类型安全检查 |
无 |
编译阶段占位符传入类型做安全检查 |
| 使用 |
较少 |
较多 |
- 业务要求使用 SQL 语句拼接时使用 Statement(如升序降序中的 desc 无法使用单引号)
- 问号占位符不能带双引号
SQL 相同语句不会重复编译
实例代码:
1
2
3
4
5
6
7
8
9
10
11
12
13
14
15
16
17
18
19
20
21
22
23
24
25
26
27
28
29
30
31
32
33
34
35
36
37
38
39
40
41
42
43
44
45
46
47
48
49
50
51
52
53
54
55
56
57
58
59
60
61
62
63
64
65
66
67
68
69
70
| package io.wataaaame.github.jdbc;
import java.sql.*;
import java.util.ResourceBundle;
import java.util.Scanner;
public class JDBCTest08 {
public static void main(String[] args) {
ResourceBundle bundle = ResourceBundle.getBundle("jdbc");
String driver = bundle.getString("driver");
String url = bundle.getString("url");
String user = bundle.getString("user");
String password = bundle.getString("password");
Connection conn = null;
Statement stmt = null;
ResultSet rs = null;
Scanner s = new Scanner(System.in);
System.out.println("order by desc/asc");
System.out.print("Plz enter: ");
String order = s.nextLine();
try {
Class.forName(driver);
conn = DriverManager.getConnection(url, user, password);
stmt = conn.createStatement();
String sql = "select * from t_user order by id " + order;
rs = stmt.executeQuery(sql);
while (rs.next()) {
System.out.println(rs.getString("id") + "\t" +
rs.getString("loginName"));
}
} catch (ClassNotFoundException e) {
e.printStackTrace();
} catch (SQLException e) {
e.printStackTrace();
} finally {
if (rs != null) {
try {
rs.close();
} catch (SQLException e) {
e.printStackTrace();
}
}
if (stmt != null) {
try {
stmt.close();
} catch (SQLException e) {
e.printStackTrace();
}
}
if (conn != null) {
try {
conn.close();
} catch (SQLException e) {
e.printStackTrace();
}
}
}
}
}
|
PreparedStatement 实现增删改
代码如下:
1
2
3
4
5
6
7
8
9
10
11
12
13
14
15
16
17
18
19
20
21
22
23
24
25
26
27
28
29
30
31
32
33
34
35
36
37
38
39
40
41
42
43
44
45
46
47
48
49
50
51
52
53
54
55
56
57
58
59
60
61
| package io.wataaaame.github.jdbc;
import java.sql.Connection;
import java.sql.DriverManager;
import java.sql.PreparedStatement;
import java.sql.SQLException;
public class JDBCTest09 {
public static void main(String[] args) {
Connection conn = null;
PreparedStatement ps = null;
try {
Class.forName("com.mysql.jdbc.Driver");
conn = DriverManager.getConnection("jdbc:mysql://localhost/learning", "root", "0.0");
String sql = "delete from t_user where id > ?";
ps = conn.prepareStatement(sql);
ps.setInt(1, 5);
int count = ps.executeUpdate();
System.out.println("Query OK, " + count + " row affected");
} catch (ClassNotFoundException e) {
e.printStackTrace();
} catch (SQLException e) {
e.printStackTrace();
} finally {
if (ps != null) {
try {
ps.close();
} catch (SQLException e) {
e.printStackTrace();
}
}
if (conn != null) {
try {
conn.close();
} catch (SQLException e) {
e.printStackTrace();
}
}
}
}
}
|
事务
JDBC 中的事物自动提交,只要执行任意一条 DML 语句,则自动提交一次
测试代码如下:
1
2
3
4
5
6
7
8
9
10
11
12
13
14
15
16
17
18
19
20
21
22
23
24
25
26
27
28
29
30
31
32
33
34
35
36
37
38
39
40
41
42
43
44
45
46
47
48
49
50
51
52
53
54
| package io.wataaaame.github.jdbc;
import java.sql.Connection;
import java.sql.DriverManager;
import java.sql.PreparedStatement;
import java.sql.SQLException;
public class JDBCTest10 {
public static void main(String[] args) {
Connection conn = null;
PreparedStatement ps = null;
try {
Class.forName("com.mysql.jdbc.Driver");
conn = DriverManager.getConnection("jdbc:mysql://localhost:3306/learning", "root", "0.0");
String sql = "update t_user set loginName = ? where id = ?";
ps = conn.prepareStatement(sql);
ps.setString(1, "aa");
ps.setInt(2, 4);
int count = ps.executeUpdate();
System.out.println(count);
ps = conn.prepareStatement(sql);
ps.setString(1, "aa");
ps.setInt(2, 4);
count = ps.executeUpdate();
System.out.println(count);
} catch (ClassNotFoundException e) {
e.printStackTrace();
} catch (SQLException e) {
e.printStackTrace();
} finally {
if (ps != null) {
try {
ps.close();
} catch (SQLException e) {
e.printStackTrace();
}
}
if (conn != null) {
try {
conn.close();
} catch (SQLException e) {
e.printStackTrace();
}
}
}
}
}
|
使用以下三行代码解决:
1
2
3
| conn.setAutoCommit(false);
conn.commit();
conn.rollback();
|
示例代码如下:
1
2
3
4
5
6
7
8
9
10
11
12
13
14
15
16
17
18
19
20
21
22
23
24
25
26
27
28
29
30
31
32
33
34
35
36
37
38
39
40
41
42
43
44
45
46
47
48
49
50
51
52
53
54
55
56
57
58
59
60
61
62
63
64
65
66
67
68
69
70
71
72
73
74
75
76
77
78
79
80
| package io.wataaaame.github.jdbc;
import java.sql.*;
public class JDBCTest11 {
public static void main(String[] args) {
Connection conn = null;
PreparedStatement ps = null;
try {
Class.forName("com.mysql.jdbc.Driver");
conn = DriverManager.getConnection("jdbc:mysql://localhost:3306/learning", "root", "0.0");
conn.setAutoCommit(false);
String sql = "update t_act set balance = ? where actno = ?";
ps = conn.prepareStatement(sql);
ps.setDouble(1, 10000);
ps.setInt(2, 101);
int count = ps.executeUpdate();
String s = null;
s.toString();
ps.setDouble(1, 10000);
ps.setInt(2, 102);
count += ps.executeUpdate();
conn.commit();
System.out.println(count == 2 ? "success" : "fail");
} catch (ClassNotFoundException e) {
e.printStackTrace();
} catch (SQLException e) {
if (conn != null) {
try {
conn.rollback();
} catch (SQLException ex) {
ex.printStackTrace();
}
}
e.printStackTrace();
} finally {
if (ps != null) {
try {
ps.close();
} catch (SQLException e) {
e.printStackTrace();
}
}
if (conn != null) {
try {
conn.close();
} catch (SQLException e) {
e.printStackTrace();
}
}
}
}
}
|
工具类的封装
1
2
3
4
5
6
7
8
9
10
11
12
13
14
15
16
17
18
19
20
21
22
23
24
25
26
27
28
29
30
31
32
33
34
35
36
37
38
39
40
41
42
43
44
45
46
47
48
49
50
51
52
53
54
55
56
57
58
59
60
61
62
63
64
| package io.wataaaame.github.jdbc.utils;
import java.sql.*;
public class JDBCUtils {
private JDBCUtils() {
}
static {
try {
Class.forName("com.mysql.jdbc.Driver");
} catch (ClassNotFoundException e) {
e.printStackTrace();
}
}
public static Connection getConnection() throws SQLException {
return DriverManager.getConnection("jdbc:mysql://localhost/learning", "root", "0,0");
}
public static void close(Connection conn, Statement stmt, ResultSet rs) {
if (rs != null) {
try {
rs.close();
} catch (SQLException e) {
e.printStackTrace();
}
}
if (stmt != null) {
try {
stmt.close();
} catch (SQLException e) {
e.printStackTrace();
}
}
if (conn != null) {
try {
conn.close();
} catch (SQLException e) {
e.printStackTrace();
}
}
}
}
|
行级锁
查询语句后加上 for update 可以保证当前事务还未结束时,行不能被其他事务修改(悲观锁,不支持并发)
乐观锁是多线程并发,事务都可以进行修改,自动添加修改后的版本号