SSM - Note02 Dynamic Proxy & MyBatis
Proxy
代理模式
目标对象不可访问,通过代理对象增强功能访问
作用:
- 控制目标对象的访问
- 增强功能
分类:
- 静态代理
- 动态代理(JDK、CGLib)
静态代理
代理模式的一种,具备以下特点:
- 目标对象和代理对象实现同一个业务接口
- 目标对象必须实现接口
- 代理对象在程序运行前就已经存在
- 灵活进行目标对象的切换,却无法进行功能的灵活处理(使用动态代理解决)
实现
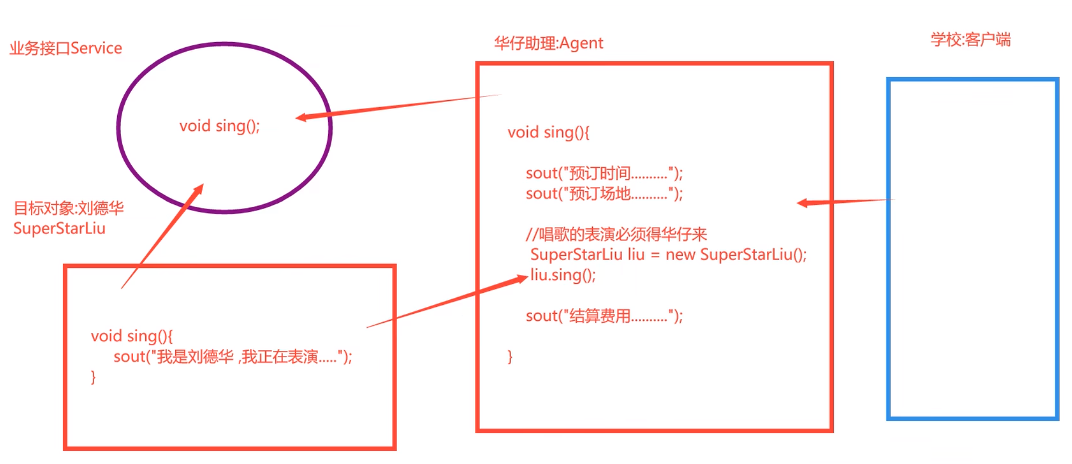
业务功能:请明星进行节目表演
明星:目标对象(无法直接访问)
助理:代理对象(可以访问,且对接明星)
客户:客户端对象
Service.java
1 | |
SuperStartLiu.java
1 | |
Agent.java
1 | |
TestSing.java
1 | |
面向接口编程
类中成员变量、方法形参、方法返回值设计为接口,调用时接口指向实现类
新增 SuperStarZhou.java
1 | |
修改后的 Agent.java
1 | |
修改后的 TestSing.java
1 | |
如此代理便可灵活选择目标对象,但是却无法灵活切换业务功能(若 Service 添加功能,接口的实现类也需要逐一添加新的业务),需要使用动态代理解决
动态代理
代理对象在程序运行的过程中动态在内存构建,可以灵活的进行业务功能的切换
JDK 动态代理
目标对象必须实现业务接口
代理对象不需要实现业务接口
动态代理对象在程序运行前不存在
在程序运行时动态的在内存中构建
动态代理灵活地进行业务功能的切换
目标对象本类中的方法(非接口中的方法)不能被代理
否则使用 CGLib 代理
动态代理类型:class com.sun.proxy.$Proxy2
类和接口
Proxy 类
java.lang.reflect.Proxy生成动态代理对象:
Proxy.newProxyInstance(ClassLoader loader, Class<?>[] interfaces, InvocationHandler h)
其中:
ClassLoader:类加载器,完成目标对象的加载
获取目标对象类加载器:
1
target.getClass().getClassLoader()Class<?>[]:目标对象实现的所有接口
获取目标对象实现的所有接口:
1
taget.getClass().getInterfaces()InvocationHandler:实现代理和业务功能,我们在调用时使用匿名内部类实现
1
2
3
4
5
6new InvocationHandler() {
@Override
public Object invoke(Object proxy, Method method, Object[] args) throws Throwable {
}
}
InvocationHandler 接口
代理的功能和目标对象的业务功能调用(类似于 Agent 的功能,增强目标对象功能),实现的方法:
public Object invoke(Object proxy, Method method, Object[] args)
其中:
- Object proxy:创建代理对象
- Method method:目标方法(如 sing/show)
- Object[] args:目标方法的参数
Method 类
反射用的类,用来进行目标对象方法的反射调用
Method 对象接住正在调用的方法(方法传递),有以下方法
Objec method.invoke(Object o, Object…args)
- Object o:目标对象
- Object…args:目标对象的参数,相当于调用
实现
Service.java
1 | |
SuperStarLiu.java
1 | |
SuperStarZhou.java
1 | |
ProxyFactory.java
1 | |
MyTest.java
1 | |
CGLib 动态代理
又称子类代理,通过动态的在内存中构建子类对象,重写父类的方法进行代理功能的增强
如果目标对象没有实现接口,则只能通过 CGLib 子类代理进行功能增强
子类代理是对象字节码框架 ASM 来实现的
原理示例
SuperStarLiu.java
1 | |
SubSuperStarLiu.java
1 | |
MyTest.java
1 | |
实现步骤
添加 spring-core-5.2.5.jar 依赖
在内存中动态构建子类
被代理的类不能为 final,否则报错,不可被重写
目标对象的方法如果为 final/static,就不会被拦截,即不会执行目标对象额外的业务方法
代码实现结构
1
2
3
4
5
6
7
8
9
10public Object getProxyInstance() {
// 使用工具类
Enhancer en = new Enhancer();
// 设置父类
en.setSuperclass(target.getClass());
// 设置回调函数
en.setCallback(this);
// 返回子类(代理)对象
return en.reate();
}
MyBatis
框架
框架是一个半成品软件,将所有公共的、重复的功能解决掉,帮助程序快速高效地进行开发,可复用、可扩展
三层架构
在项目开发中遵循的一种形式模式,分为三层
- 界面层:用来接收客户端的输入,调用业务逻辑层进行功能处理,返回结果给客户端
- 业务逻辑层:用来进行整个项目的业务逻辑处理,向上为界面层处理结果,向下向数据访问层要数据
- 数据访问层:专门用来进行数据库的增删改查操作,向上为业务逻辑层提供数据
各层之间调用顺序固定,不允许跨层访问

三层架构优点:
- 结构清晰、耦合度低,各层分工明确
- 可维护性高,可扩展性高
- 有利于标准化
- 开发人员可只关注架构中某一层的功能实现
- 有利于各层逻辑的复用
SSM
Spring:整合了其他框架的框架,核心是 IOC 和 AOP,由 20 多个模块构成,在很多领域都提供了很好的解决方案
SpringMVC:Spring 家族的一员,专门用来优化控制器(Servlet),提供了既简单的数据提交、数据携带、页面跳转等功能
MyBatis:持久化层(数据访问层)的框架,用来进行数据库访问的优化,专注于 sqo 语句,极大的简化了 JDBC 的访问
MyBatis 框架
MyBatis 本身是 apache 的一个开源项目 iBatis,2010 年这个项目由 apache software foundation 迁移到了 google code,并且更名为 MyBaic,2013 年 11 月迁移到了 Github
MyBatis 完成数据访问层的优化,专注于 sql 语句,简化了过去 JDBC 繁琐的访问机制
结构
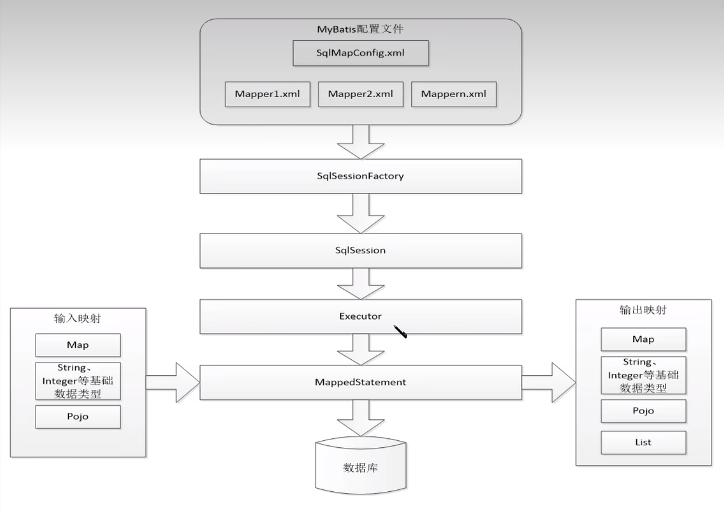
sqlMapConfig.xml:核心配置文件
Mapper.xml:sql 语句
SqlSessionFactory:工厂模式集中创建 SqlSession 对象
SqlSession:Connection + PreparedStatement
Executor:底层执行器(看不到)
MapperdStatement:sql 语句,通过输入映射输入,执行完通过输出映射返回值
快速入门
添加框架的步骤:
- 添加依赖
- 添加配置文件
具体步骤:
准备数据库
1
2
3
4
5
6
7
8
9
10
11
12
13
14
15create database ssm default charset utf8;
use ssm;
create table student (
id int(11) auto_increment primary key,
name varchar(255) default null,
email varchar(255) default null,
age int(11) default null
) engine=innodb default charset=utf8;
insert into student(name, email, age) values('vv', 'vv@vv.com', 22);
insert into student(name, email, age) values('ee', 'ee@vv.com', 21);
insert into student(name, email, age) values('xx', 'xx@vv.com', 24);
insert into student(name, email, age) values('yy', 'yy@vv.com', 48);
select * from student;创建 maven module
修改目录
修改 pom.xml
依赖:
1
2
3
4
5
6
7
8
9
10
11
12
13<!-- MyBatis 依赖 -->
<dependency>
<groupId>org.mybatis</groupId>
<artifactId>mybatis</artifactId>
<version>3.5.6</version>
</dependency>
<!-- MySQL 依赖 -->
<dependency>
<groupId>mysql</groupId>
<artifactId>mysql-connector-java</artifactId>
<version>5.1.32</version>
</dependency>添加资源文件指定(将非 java 文件也添加到 classes 中)
1
2
3
4
5
6
7
8
9
10
11
12
13
14
15
16
17
18
19
20<build>
<!-- 资源文件指定 -->
<resources>
<resource>
<directory>src/main/java</directory>
<includes>
<include>**/*.xml</include>
<include>**/*.properties</include>
</includes>
</resource>
<resource>
<directory>src/main/resources</directory>
<includes>
<include>**/*.xml</include>
<include>**/*.properties</include>
</includes>
</resource>
</resources>
</build>IDEA 中添加数据库的可视化
- 右侧点击 Database,点击 + 号,选择 Data Sources 选中 MySQL
- 输入 User、Password、Database
- 若提示缺少 JDBC,点击左上角扳手,添加驱动
- 点击 Test Connection,成功即可
添加 jdbc.properties 属性文件(数据库的配置)
将以下文件置于
src/main/resources中jdbc.properties
1
2
3
4jdbc.driverClassName=com.mysql.jdbc.Driver
jdbc.url=jdbc:mysql://localhost:3306/ssm?useUnicode=true&characterEncoding=utf8
jdbc.username=root
jdbc.password=0.0添加 SqlMapConfig.xml 文件(MyBatis 核心配置文件)
将以下文件置于
src/main/resources中1
2
3
4
5
6
7
8
9
10
11
12
13
14
15
16
17
18
19
20
21
22
23
24
25
26
27
28
29
30
31
32
33
34
35
36
37
38
39
40
41
42
43
44
45
46
47<?xml version="1.0" encoding="UTF-8" ?>
<!DOCTYPE configuration PUBLIC "-//mybatis.org//DTD Config 3.0//EN"
"http://mybatis.org/dtd/mybatis-3-config.dtd">
<configuration>
<!-- 读取属性文件(jdbc.properties)
resource:从 resources 目录下找指定名称的文件加载
url:使用绝对路径注册 -->
<properties resource="jdbc.properties"></properties>
<!-- 配置数据库的环境变量 -->
<environments default="development">
<environment id="development">
<!-- 事务管理器
JDBC:事务的控制交给程序员处理
MANAGED:由容器(Spring)来管理事务 -->
<transactionManager type="JDBC"></transactionManager>
<!-- 配置数据源
JNDI:Java 命名目录接口,在服务器端进行数据库连接池的管理
POOLED:使用数据库连接池
UNPOLLED:不使用数据库连接池 -->
<dataSource type="POOLED">
<!-- 配置数据库连接的基本参数 -->
<property name="driver" value="${jdbc.driverClassName}"/>
<property name="url" value="${jdbc.url}"/>
<property name="username" value="${jdbc.username}"/>
<property name="password" value="${jdbc.password}"/>
</dataSource>
</environment>
<!-- 以下为居家或上线后的环境变量配置 -->
<!-- <environment id="home">-->
<!-- <transactionManager type=""></transactionManager>-->
<!-- <dataSource type=""></dataSource>-->
<!-- </environment>-->
<!-- <environment id="online">-->
<!-- <transactionManager type=""></transactionManager>-->
<!-- <dataSource type=""></dataSource>-->
<!-- </environment>-->
</environments>
<!-- 注册 mapper.xml 文件
resource:从 resources 目录下找指定文件名称的文件注册
url:使用绝对路径注册
class:动态代理方式下的注册 -->
<mappers>
<mapper resource="StudentMapper.xml"></mapper>
</mappers>
</configuration>Ctrl + 点击,可以进入到
http://mybatis.org/dtd/mybatis-3-config.dtd中查看标签的 dtd 文档(头文档,还有一种 xsd 格式)1
<!ELEMENT configuration (properties?, settings?, typeAliases?, typeHandlers?, objectFactory?, objectWrapperFactory?, reflectorFactory?, plugins?, environments?, databaseIdProvider?, mappers?)>- 标签 ? 代表出现顺序不可改变
配置选项可以在 MyBatis 依赖目录中找到对应字段
创建实体类 Student,用来封装数据
1
2
3
4
5
6
7
8
9
10
11
12
13
14
15
16
17
18
19
20
21
22
23
24
25
26
27
28
29
30
31
32
33
34
35
36
37
38
39
40
41
42
43
44
45
46
47
48
49
50
51
52
53
54
55
56
57
58
59
60
61
62
63
64
65
66package io.github.wataaaame.bean;
public class Student {
private Integer id;
private String name;
private String email;
private Integer age;
public Student() {
}
public Student(String name, String email, Integer age) {
this.name = name;
this.email = email;
this.age = age;
}
public Student(Integer id, String name, String email, Integer age) {
this.id = id;
this.name = name;
this.email = email;
this.age = age;
}
public Integer getId() {
return id;
}
public void setId(Integer id) {
this.id = id;
}
public String getName() {
return name;
}
public void setName(String name) {
this.name = name;
}
public String getEmail() {
return email;
}
public void setEmail(String email) {
this.email = email;
}
public Integer getAge() {
return age;
}
public void setAge(Integer age) {
this.age = age;
}
@Override
public String toString() {
return "Student{" +
"id=" + id +
", name='" + name + '\'' +
", email='" + email + '\'' +
", age=" + age +
'}';
}
}添加完成学生表的增删改查功能的 StudentMapper.xml 文件
1
2
3
4
5
6
7
8
9
10
11
12
13
14
15
16
17
18
19
20
21
22
23
24
25
26
27
28
29
30
31
32
33
34
35
36
37
38<?xml version="1.0" encoding="UTF-8" ?>
<!DOCTYPE mapper PUBLIC "-//mybatis.org//DTD Mapper 3.0//EN"
"http://mybatis.org/dtd/mybatis-3-mapper.dtd">
<!-- namespace
指定命名空间(相当于包名),用来区分不同 mapper.xml 文件中相同的 id 属性 -->
<mapper namespace="student">
<!-- 查询全部学生的功能
resultType:指定查询返回的结果集类型,如果是集合,则必须是泛型
parameterType:如果有参数,则通过它来指定参数类型 -->
<select id="getAll" resultType="io.github.wataaaame.bean.Student">
select id, name, email, age from student
</select>
<!-- 按主键 id 查询学生信息 -->
<select id="getById" parameterType="int" resultType="io.github.wataaaame.bean.Student">
select id, name, email, age from student where id=#{id}
</select>
<!-- 按学生名称模糊查询 -->
<select id="getByName" parameterType="string" resultType="io.github.wataaaame.bean.Student">
select id, name, email, age from student where name like '%${name}%'
</select>
<!-- 增加学生 -->
<insert id="insert" parameterType="io.github.wataaaame.bean.Student">
insert into student(name, email, age) values(#{name}, #{email}, #{age})
</insert>
<!-- 按 id 删除学生 -->
<delete id="deleteById" parameterType="int">
delete from student where id = #{id}
</delete>
<!-- 更新学生 -->
<update id="updateById" parameterType="io.github.wataaaame.bean.Student">
update student set name=#{name}, email=#{email}, age=#{age} where id=#{id}
</update>
</mapper>创建测试类进行功能测试
1
2
3
4
5
6
7
8
9
10
11
12
13
14
15
16
17
18
19
20
21
22
23
24
25
26
27
28
29
30
31
32
33
34
35
36
37
38
39
40
41
42
43
44
45
46
47
48
49
50
51
52
53
54
55
56
57
58
59
60
61
62
63
64
65
66
67
68
69
70
71
72
73
74
75
76
77
78
79
80
81
82
83
84
85
86package io.github.wataaaame.test;
import io.github.wataaaame.bean.Student;
import org.apache.ibatis.io.Resources;
import org.apache.ibatis.session.SqlSession;
import org.apache.ibatis.session.SqlSessionFactory;
import org.apache.ibatis.session.SqlSessionFactoryBuilder;
import org.junit.Test;
import java.io.IOException;
import java.io.InputStream;
import java.util.List;
public class MyTest {
@Test
public void testGetAll() throws IOException {
// 使用文件流读取核心配置文件 SqlMapConfig.xml
InputStream input = Resources.getResourceAsStream("SqlMapConfig.xml");
// 创建 SqlSessionFactory 工厂
SqlSessionFactory factory = new SqlSessionFactoryBuilder().build(input);
// 取出 sqlSession 对象
SqlSession sqlSession = factory.openSession();
// 完成查询工作
List<Student> list = sqlSession.selectList("student.getAll");
list.forEach(student -> System.out.println(student));
// 关闭 sqlSession
sqlSession.close();
}
@Test
public void testGetById() throws IOException {
InputStream inputStream = Resources.getResourceAsStream("SqlMapConfig.xml");
SqlSessionFactory factory = new SqlSessionFactoryBuilder().build(inputStream);
SqlSession sqlSession = factory.openSession();
// 通过 id 查询某一个学生
Student student = sqlSession.selectOne("student.getById", 1);
System.out.println(student);
sqlSession.close();
}
@Test
public void testGetByName() throws IOException {
InputStream inputStream = Resources.getResourceAsStream("SqlMapConfig.xml");
SqlSessionFactory factory = new SqlSessionFactoryBuilder().build(inputStream);
SqlSession sqlSession = factory.openSession();
List<Student> students = sqlSession.selectList("student.getByName", "e");
students.forEach(student -> System.out.println(student));
sqlSession.close();
}
@Test
public void testInsert() throws IOException {
InputStream inputStream = Resources.getResourceAsStream("SqlMapConfig.xml");
SqlSessionFactory factory = new SqlSessionFactoryBuilder().build(inputStream);
SqlSession sqlSession = factory.openSession();
int count = sqlSession.insert("student.insert", new Student("豪客", "haoke@vv.com", 34));
System.out.println(count + " row has done!");
// 切记:transactionManager type="JDBC" 模式下,
// 增删改后必须手动提交事务
sqlSession.commit();
sqlSession.close();
}
@Test
public void testDeleteById() throws IOException {
InputStream inputStream = Resources.getResourceAsStream("SqlMapConfig.xml");
SqlSessionFactory factory = new SqlSessionFactoryBuilder().build(inputStream);
SqlSession sqlSession = factory.openSession();
int count = sqlSession.delete("student.deleteById", 6);
sqlSession.commit();
System.out.println(count + " row has done!");
sqlSession.close();
}
@Test
public void testUpdateById() throws IOException {
InputStream inputStream = Resources.getResourceAsStream("SqlMapConfig.xml");
SqlSessionFactory factory = new SqlSessionFactoryBuilder().build(inputStream);
SqlSession sqlSession = factory.openSession();
int count = sqlSession.update("student.updateById", new Student(4,"宝岛", "baodao@vv.com", 6));
sqlSession.commit();
System.out.println(count + " row has done!");
sqlSession.close();
}
}
对象分析
Resources 类
解析 SqlMapConfig.xml 文件,创建出相应的对象
InputStream inputStream = Resource.getResourceAsStream("SqlMapConfig.cml");SqlSessionFactory 接口
通过解析配置文件构建当前工厂的参数,生成工厂对象
使用 ctrl+h 快捷键查看本接口的字接口及实现类
DefaultSqlSessionFactory 是实现类
SqlSessionFactory factory = new SqlSessionFactoryBuilder().build(inputStream);SqlSession 接口
DefaultSqlSession 是实现类
优化
优化测试类
MyTest.java
1 | |
实体类注册别名
SqlMapConfig.cml 中,添加 typeAliass 标签(注意标签位置),在 Mapper.xml 文件中封装对象的 bean 目录即可省略
单个注册
1
2
3<typeAliass>
<typeAlias type="io.github.wataaaame.bean.Student" alias="student"></typeAlias>
</typeAliass>批量注册
别名是类名的驼峰命名法(规范)
1
2
3<typeAliass>
<package name="io.github.wataaaame.bean"></package>
</typeAliass>
设置日志输出
settings 标签中设置日志输出选项
1 | |
*动态代理
在三层架构中,业务逻辑层要通过接口访问数据访问层的功能,而 Mapper.xml 是一个 xml 文件,无法直接获取访问
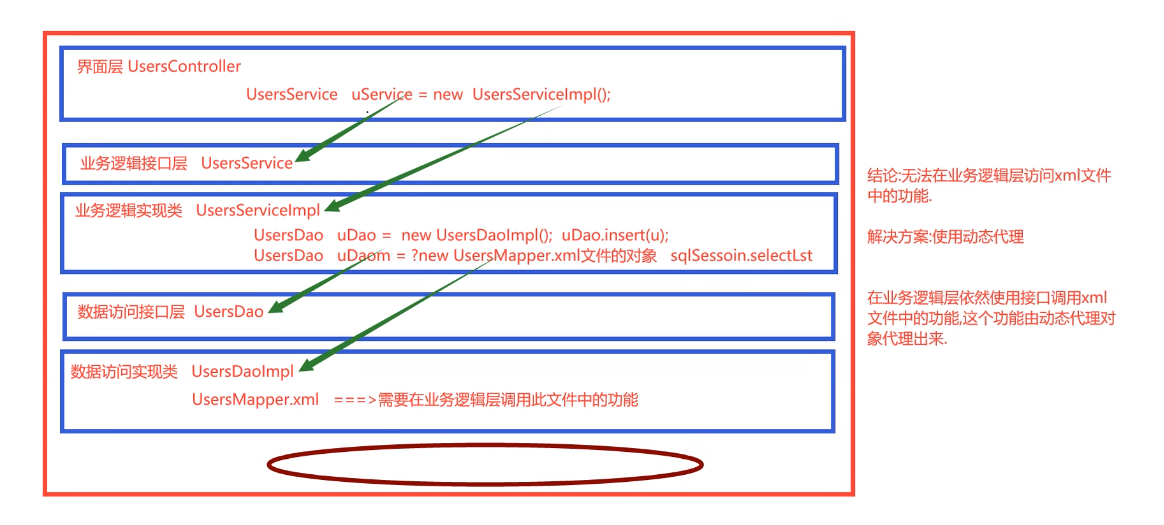
使用动态代理实现
实现规范
UsersMapper.xml 与 UsersMapper.java
- 必须在同一个目录下
- 文件名一致
- id 与方法名称完全一致
- parameterType 与参数一致
- resultType 与返回值类型一致
- namespace 是接口的完全限定名称
io.github.wataaaame.mapper.UsersMapper - SqlMapConfig.xml 注册 mapper 时,使用 class = 接口的完全限定名称
访问步骤
建表 User
1
2
3
4
5
6
7
8
9
10
11
12
13
14
15
16
17
18
19
20
21
22
23use ssm;
-- --------------------------
-- Table structure for 'user'
-- --------------------------
DROP TABLE IF EXISTS user;
CREATE TABLE user (
id int(11) NOT NULL AUTO_INCREMENT,
username varchar(32) NOT NULL,
birthday date DEFAULT NULL,
sex char(1) DEFAULT NULL,
address varchar(255) DEFAULT NULL,
PRIMARY KEY(id)
) ENGINE=InnoDB AUTO_INCREMENT=101 DEFAULT CHARSET=utf8;
-- ---------------
-- Records of user
-- ---------------
INSERT INTO user(username, birthday, sex, address) VALUE('vv', '2002-04-13', '1', '武汉');
INSERT INTO user(username, birthday, sex, address) VALUE('ee', '2001-03-27', '0', '贵州');
INSERT INTO user(username, birthday, sex, address) VALUE('李明', '2004-01-2', '1', '北京');
INSERT INTO user(username, birthday, sex, address) VALUE('王恒', '1994-08-21', '1', '上海');
INSERT INTO user(username, birthday, sex, address) VALUE('芳芳', '2003-12-7', '0', '福建');
select id, username, birthday, sex, address from user;新建 maven,刷新可视化
修改目录、修改 pom.xml、添加依赖、添加 build - resources 标签
添加 jdbc.properties
添加 SqlMapConfig.xml
1
2
3
4
5
6
7
8
9
10
11
12
13
14
15
16
17
18
19
20
21
22
23
24
25
26
27
28
29
30
31
32
33
34
35
36
37<?xml version="1.0" encoding="UTF-8" ?>
<!DOCTYPE configuration PUBLIC "-//mybatis.org//DTD Config 3.0//EN"
"http://mybatis.org/dtd/mybatis-3-config.dtd">
<configuration>
<!-- 获取资源 -->
<properties resource="jdbc.properties"></properties>
<!-- 开启日志 -->
<settings>
<setting name="logImpl" value="STDOUT_LOGGING"/>
</settings>
<!-- 注册实体类别名 -->
<typeAliases>
<package name="github.wataaaame.bean"/>
</typeAliases>
<!-- 配置环境变量 -->
<environments default="development">
<environment id="development">
<transactionManager type="JDBC"></transactionManager>
<dataSource type="POOLED">
<property name="driver" value="${jdbc.driverClassName}"/>
<property name="url" value="${jdbc.url}"/>
<property name="username" value="${jdbc.username}"/>
<property name="password" value="${jdbc.password}"/>
</dataSource>
</environment>
</environments>
<!-- 注册 Mapper 文件 -->
<mappers>
<!-- <mapper class="github.wataaaame.mapper.UserMapper"></mapper>-->
<!-- 批量注册 -->
<package name="github.wataaaame.mapper"/>
</mappers>
</configuration>添加实体类
添加 mapper 文件夹,新建 UserMapper 接口与 xml 文件,完成增删改查 sql
UserMapper.java
1
2
3
4
5
6
7
8
9
10
11
12
13
14
15
16
17
18
19
20
21
22
23
24
25
26
27
28
29package github.wataaaame.mapper;
import github.wataaaame.bean.User;
import java.util.List;
/**
* 数据访问层的接口,规定的数据库中可进行的各种操作
*/
public interface UserMapper {
// 查询全部用户信息
List<User> getAll();
// 根据 id 查信息
User getById(int id);
// 根据用户名模糊查询
List<User> getByName(String username);
// 更新用户信息
int update(User user);
// 增加用户
int insert(User user);
// 根据 id 删除用户
int delete(int id);
}UserMapper.xml
1
2
3
4
5
6
7
8
9
10
11
12
13
14
15
16
17
18
19
20
21
22
23
24
25
26
27
28
29
30
31
32
33
34
35
36<?xml version="1.0" encoding="UTF-8" ?>
<!DOCTYPE mapper PUBLIC "-//mybatis.org//DTD Mapper 3.0//EN"
"http://mybatis.org/dtd/mybatis-3-mapper.dtd">
<mapper namespace="github.wataaaame.mapper.UserMapper">
<!-- 查询全部用户信息 -->
<select id="getAll" resultType="user">
select id, username, birthday, sex, address from user;
</select>
<!-- 根据 id 查信息 -->
<select id="getById" parameterType="int" resultType="user">
select id, username, birthday, sex, address from user where id = #{id}
</select>
<!-- 根据用户名模糊查询 -->
<select id="getByName" parameterType="String" resultType="user">
select id, username, birthday, sex, address from user
where username like '%${username}%'
</select>
<!-- 更新用户信息 -->
<update id="update" parameterType="user">
update user set username=#{username}, birthday=#{birthday}, sex=#{sex}, address=#{address}
where id=#{id}
</update>
<!-- 增加用户 -->
<insert id="insert" parameterType="user">
insert into user(username, birthday, sex, address) values(#{username}, #{birthday}, #{sex}, #{address})
</insert>
<!-- 根据 id 删除用户 -->
<delete id="delete" parameterType="int">
delete from user where id=#{id}
</delete>
</mapper>添加测试类,测试功能
1
2
3
4
5
6
7
8
9
10
11
12
13
14
15
16
17
18
19
20
21
22
23
24
25
26
27
28
29
30
31
32
33
34
35
36
37
38
39
40
41
42
43
44
45
46
47
48
49
50
51
52
53
54
55
56
57
58
59
60
61
62
63
64
65
66
67
68
69
70
71
72
73
74
75
76
77
78
79
80
81
82
83
84
85package github.wataaaame.test;
import github.wataaaame.bean.User;
import github.wataaaame.mapper.UserMapper;
import org.apache.ibatis.io.Resources;
import org.apache.ibatis.session.SqlSession;
import org.apache.ibatis.session.SqlSessionFactory;
import org.apache.ibatis.session.SqlSessionFactoryBuilder;
import org.junit.After;
import org.junit.Before;
import org.junit.Test;
import java.io.IOException;
import java.io.InputStream;
import java.text.ParseException;
import java.text.SimpleDateFormat;
import java.util.List;
public class MyTest {
private SqlSession sqlSession;
private UserMapper userMapper;
SimpleDateFormat sdf = new SimpleDateFormat("yyyy-MM-dd");
@Before
public void openSqlSession() throws IOException {
InputStream inputStream = Resources.getResourceAsStream("SqlMapConfig.xml");
SqlSessionFactory factory = new SqlSessionFactoryBuilder().build(inputStream);
sqlSession = factory.openSession();
// 取出动态代理对象,完成接口中方法的调用,实则调用 xml 文件中相应的标签功能
userMapper = sqlSession.getMapper(UserMapper.class);
}
@After
public void closeSqlSession() {
sqlSession.close();
}
@Test
// 查询全部用户信息
public void testGetAll() {
// 就是调用接口的方法,MyBaits 已经将功能代理出来了
List<User> userList = userMapper.getAll();
userList.forEach(user -> System.out.println(user));
}
@Test
// 根据 id 查信息
public void testGetById() {
User user = userMapper.getById(101);
System.out.println(user);
}
@Test
// 根据用户名模糊查询
public void testGetByName() {
List<User> userList = userMapper.getByName("王");
userList.forEach(user -> System.out.println(user));
}
@Test
// 更新用户信息
public void updateById() throws ParseException {
int count = userMapper.update(new User(106, "王华", sdf.parse("1999-08-31"), '1', "河南"));
sqlSession.commit();
System.out.println(count + " has done");
}
@Test
// 增加用户
public void insert() throws ParseException {
int count = userMapper.insert(new User("宝岛", sdf.parse("1999-08-31"), '0', "台北二路"));
sqlSession.commit();
System.out.println(count + " row has done!");
}
@Test
// 根据 id 删除用户
public void delete() {
int count = userMapper.delete(108);
sqlSession.commit();
System.out.println(count + " row has done!");
}
}
#{} 与 ${}
#{}:对非字符串拼接参数的占位符,底层是 PreparedStatement(防止 sql 注入)
- 如果是简单数据类型,内容可任意写
- 如果是对象类型,内容必须为成员变量名
${}:字符串拼接替换,底层是 Statement(sql 注入风险)
- 如果是简单数据类型,内容可任意写(3.5.1 以下版本只能写 value)
- 如果是对象类型,内容必须为成员变量名
- 可替换列名和表名
模糊查询优化
使用 concat() 拼接字符串,参数便可使用 #{}
1 | |
返回主键代码
返回上次插入的主键 id 的 sql
1 | |
在插入语句结束后,返回自增的主键值 id 到入参的 user 对象
UserMapper.java
1 | |
UserMapper.xml
1 | |
keyProperty:user 对象接收返回主键值的属性
resultType:返回的主键类型
order:在插入语句执行 前/后 执行
MyTest.java
1 | |
UUID
全球唯一字符串,由 36 个字母数字中划线组成,应对多库多表自增 id 时的重复问题
Java 中:
1 | |
sql 中:
1 | |
*动态 SQL
可以定义代码片段,进行逻辑判断、循环处理(批量处理),使条件判断更为简单
sql 标签
用来定义代码片段,可以将所有的列名或复杂的条件定义为代码片段,供使用时调用
1 | |
include 标签
用来引用 sql 定义的代码片段
1 | |
if 标签
进行条件判断
where:多条件拼接,在查询、删除、更新中使用
第一个 and 会自动删除
Example:多条件查询:根据多条件查询用户的所有信息
UserMapper.java
1 | |
UserMapper.xml
1 | |
MyTest.java
1 | |
set 标签
有选择地更新
至少更新一列,否则提交报错
UserMapper.java
1 | |
UserMapper.xml
1 | |
MyTest.java
1 | |
forEach 标签
用于循环遍历,完成循环 条件查询/批量删除/批量增加/批量更新)
参数详解:
- collection:指定入参类型(小写表示),常见的有:list 集合、map 集合、array 数组
- item:每次循环遍历出来的值或对象
- separator:多个值或对象或语句之间的分隔符
- open:整个循环外面的前括号
- close:整个循环外面的后括号
Example 1:查询多个指定 id 的用户信息
UserMapper.java
1 | |
UserMapper.xml
1 | |
MyTest.java
1 | |
Example 2:实现批量删除
UserMapper.java
1 | |
UserMapper.xml
1 | |
MyTest.java
1 | |
Example 3:批量增加
UserMapper.java
1 | |
UserMapper.xml
1 | |
MyTest.java
1 | |
Example 4:批量更新
*若要使用批量更新,必须在 jdbc.properties 中的 url 下添加 &allowMultiQueries=true 选项
UserMapper.java
1 | |
UserMapper.xml
1 | |
MyTest.java
1 | |
指定参数名称
通过 @Param 注解指定参数名称
UserMapper.java
1 | |
UserMapper.xml
1 | |
1 | |
指定参数位置
如果入参是多个,可以通过指定参数位置进行传参
实体类只能封装住成员变量的条件,如果某个成员变量需要区间范围内的判断(如日期),则实体类包不住
通过 #{arg0} 指定下标为 0 的元素,虽然可用,但语义不明确
Example:查询指定日期范围内的用户信息
UserMapper.java
1 | |
UserMapper.xml
1 | |
MyTest.java
1 | |
*入参是 Map
如果入参超过一个以上,使用 Map 封装查询条件更有语义
UserMapper.java
1 | |
UserMapper.xml
1 | |
MyTest.java
1 | |
反回值是 Map
如果返回的数据实体类无法包含,可以使用 Map 返回多张表的若干数据
返回后这些数据之间没有任何关系,就是 Object 数据类型
Example 1:返回一行 Map
UserMapper.java
1 | |
UserMapper.xml
1 | |
MyTest.java
1 | |
Example 2:返回多行 Map
UserMapper.java
1 | |
UserMapper.xml
1 | |
MyTest.java
1 | |
实体类与列名不一致
实体类属性与数据库表对应列名不一致时的解决方法
使用别名
将表列名的别名设置为实体类对应的属性
使用 resultMap 手工完成映射
1
2
3
4
5
6
7
8
9
10<resultMap id="bookmap" type="book">
<!-- 主键映射 -->
<id properties="id" column="bookid"></id>
<!-- 非主键映射 -->
<result properties="name" colum="bookname"></result>
</resultMap>
<select id="getAll" resultMap="bookMap">
select bookid, bookname
from book
</select>
表的关联关系
关联关系有四个方向:
一对多关联
客户对订单
对于实体类属性含有另一个实体类,也需要使用 resultMap 进行手工映射
- 使用左外连接,即使没有订单也能查到用户信息
1
2
3
4
5
6
7
8
9
10
11
12
13
14
15
16
17
18
19
20
21<resultMap id="customermap" type="customer">
<!-- 主键绑定 -->
<id property="id" column="cid"></id>
<!-- 非主键绑定 -->
<result property="name" column="name"></result>
<result property="age" column="age"></result>
<!-- 实体类绑定为集合(属性名称和泛型类型)(使用 ofType) -->
<collection property="ordersList" ofType="orders">
<!-- 主键绑定 -->
<id property="id" column="oid"></id>
<!-- 非主键绑定 -->
<result property="orderNumber" column="orderNumber"></result>
<result property="orderPrice" column="orderPrice"></result>
</collection>
</resultMap>
<select id="getById" parameterType="int" resultType="customermap">
select c.id cid, name, age, o.id oid, orderNumber, orderPrice, customer_id
from customer c left join orders o on c.id = o.customer_id
where c.id = #{id}
</select>多对一关联
订单对客户
使用 resultMap 映射,且 inner join 足矣
1
2
3
4
5
6
7
8
9
10
11
12
13
14
15
16
17
18<resultMap id="ordersmap" type="orders">
<id property="oid" column="oid"></id>
<result property="orderNumber" column="orderNumber"></result>
<result property="orderPrice" column="orderPrice"></result>
<!-- 绑定为一个实体类(使用 javaType) -->
<association property="customer" javaType="customer">
<id property="cid" column="cid"></id>
<result property="name" column="name"></result>
<result property="age" column="age"></result>
</association>>
</collection>
</resultMap>
<select id="getById" parameterType="int" resultType="ordersmap">
select o.id oid, orderNumber, orderPrice, customer_id, c.id cid, name, age
from order o inner join customer c on o.customer_id = c.id
where o.id = #{id}
</select>一对一关联
直接使用 assosiation 映射即可
多对多关联
使用中间表描述多对多表中的主键关系
总结:无论是什么关联关系,如果某方持有另一方的集合,则使用 collection 标签完成映射;如果某方持有另一方对象,则使用 association 标签完成映射
collection 与 association 可相互嵌套
标签中可以使用 select 进行导包 id 查询,通过 column 名传递入参
这种解决方案不需要做表关联查询
一对多优化:
1
2
3
4
5
6
7
8
9
10<resultMap id="customermap" type="customer">
<id property="id" column="id"></id>
<result property="name" column="name"></result>
<result property="age" column="age"></result>
<!-- column 是当前客户表 id,传给嵌套查询作为入参进行查询,返回该客户名下的所有订单集合 -->
<collection property="ordersList" ofType="order" column="id" select="github.wataaaame.demo.mapper.OrderMapper.getOrderByCustomerId"></collection>
</resultMap>
<select id="findById" parameterType="int" resultMap="customermap">
select * from customer where id = #{id}
</select>
事务
多个操作同时完成或同时失败成为事务管理
事务有四个特性:一致性、持久性、原子性、隔离性
在 SqlMapConfig.xml中设置事务:
1 | |
在 Test.java 中可设置为自动提交:
1 | |
- 默认手工提交
缓存(面试)
缓存是为了提高查询效率
MyBatis 框架提供两级缓存,一级缓存和二级缓存,默认开启一级缓存
使用缓存后查询流程:
- 查询时先到缓存中查,若没有则查询数据库,然后放缓存一份,再返回给客户端
- 下次查询时直接从缓存中返回,不再访问数据库
- 如果数据库发生 commit() 操作则清空缓存
一级缓存:使用 SqlSession 作用域,同一个 SqlSession 共享一级缓存
二级缓存:使用 Mapper 作用域,不同 SqlSession 访问同一个 Mapper 文件则共享二级缓存作用域
在 SQLMapConfig.xml 中加入设置
1
2
3
4<!-- 开启二级缓存 -->
<settings>
<setting name="cacheEnabled" value="true"></setting>
</settings>在 UserMapper.xml 中开启二级缓存(使用 cache 标签)
1
2
3<mapper namespace="github.wataaaame.demo.mapper.UserMapper">
<cache></cache>
</mapper>实体类必须实现 java.io.serializable 接口,保证实体可序列化
1
2public class User implements Serializable {
}
ORM 映射
ORM(Object Relational Mapping):对象关系映射
MyBatis 框架是 ORM 持久化优秀的框架
Java 语言中以对象的方式操作数据,存到数据库中是以表的方式进行存储,对象中的成员变量与表中的列之间的数据互换称为映射,整个操作称为 ORM
持久化操作:将对象保存到关系数据库中,将关系型数据库中的数据读取出来以对象形式封装
源码追踪
注册 Mapper 优先级:package > resource > url > class
alt + 7:列出本接口或类中的全部成员(成员方法和成员变量)
ctrl + h:列出本接口的实现类,或本类的所有子类,改变按钮可以得到父接口和父类
附录
typeAliases
类型别名是为 Java 类型命名一个短的名字,只和 XML 配置有关,只用来减少类完全限定名的多余部分
| 别名 | 映射 |
|---|---|
| _byte | byte |
| _long | long |
| _short | short |
| _int | int |
| _integer | int |
| _double | double |
| _float | float |
| _boolean | boolean |
| string | String |
| byte | Byte |
| long | Long |
| short | Short |
| int | Integer |
| integer | Integer |
| double | Double |
| float | Float |
| boolean | Boolean |
| date | Date |
| decimal | BigDecimal |
| bigdecimal | BigDecimal |
| object | Object |
| map | Map |
| hashmap | HashMap |
| list | List |
| arraylist | ArrayList |
| collection | Collection |
| iterator | Iterator |