SSM - Note04 SpringMVC
SpringMVC
基于 MVC 开发模式的框架,用来优化控制器,是 Spring 家族的一员,也具备 IOC 与 AOP
特点:
- 轻量级,基于 MVN 框架
- 易于上手、容易理解、功能强大
- 具备 IOC 与 AOP
- 完全基于注解开发
MVC
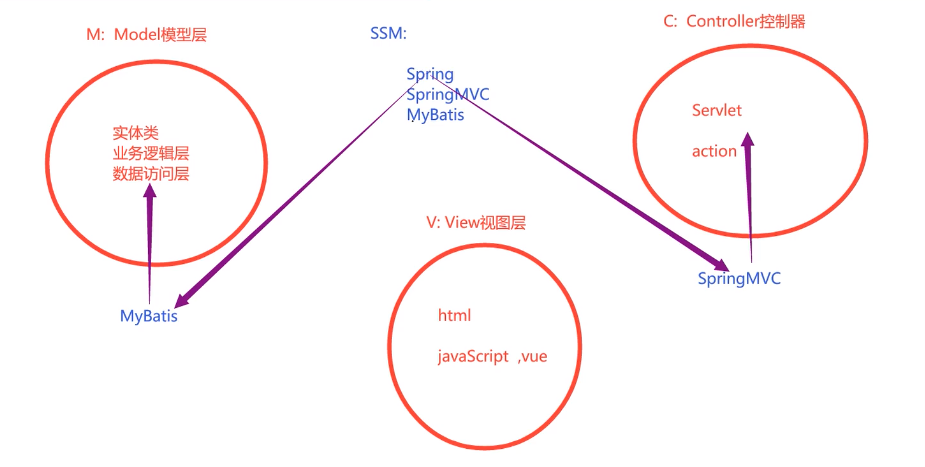
一种开发模式,是模型视图控制器的简称,所有的 web 应用都是基于 MVC 开发
- M:模型层,包含实体类、业务逻辑层、数据访问层
- V:视图层,如 html、javascript、vue 等,用来显现数据
- C:控制器,用来接收客户端请求,返回响应到客户端的组件,如 Servlet
注解式开发
新建项目,选择 webapp 模板
修改目录,添加缺失的 test、java、resources(两套),并修改目录属性
修改 pom.xml 文件,添加 SpringMVC 依赖,添加 Servlet 依赖
1
2
3
4
5
6
7
8
9
10
11
12
<!-- SpringMVC 依赖 -->
<dependency>
<groupId>org.springframework</groupId>
<artifactId>spring-webmvc</artifactId>
<version>5.2.5.RELEASE</version>
</dependency>
<!-- Servlet 依赖 -->
<dependency>
<groupId>javax.servlet</groupId>
<artifactId>javax.servlet-api</artifactId>
<version>3.1.0</version>
</dependency>添加 springmvc.xml 配置文件,指定包扫描,添加视图解析器
1
2
3
4
5
6
7
8
9
10
11
12
13
14
15
16
<?xml version="1.0" encoding="UTF-8"?>
<beans xmlns="http://www.springframework.org/schema/beans"
xmlns:xsi="http://www.w3.org/2001/XMLSchema-instance"
xmlns:context="http://www.springframework.org/schema/context"
xsi:schemaLocation="http://www.springframework.org/schema/beans http://www.springframework.org/schema/beans/spring-beans.xsd http://www.springframework.org/schema/context https://www.springframework.org/schema/context/spring-context.xsd">
<!-- 添加包扫描 -->
<context:component-scan base-package="github.wataaaame.controller"></context:component-scan>
<!-- 添加视图解析器 -->
<bean class="org.springframework.web.servlet.view.InternalResourceViewResolver">
<!-- 配置前缀 -->
<property name="prefix" value="/admin/"></property>
<!-- 配置后缀 -->
<property name="suffix" value=".jsp"></property>
</bean>
</beans>Project Structure 中,点击项目中的 Web,删除旧的 web.xml,点击应用,新建 web.xml
否则 jsp 中 EL 表达式失效
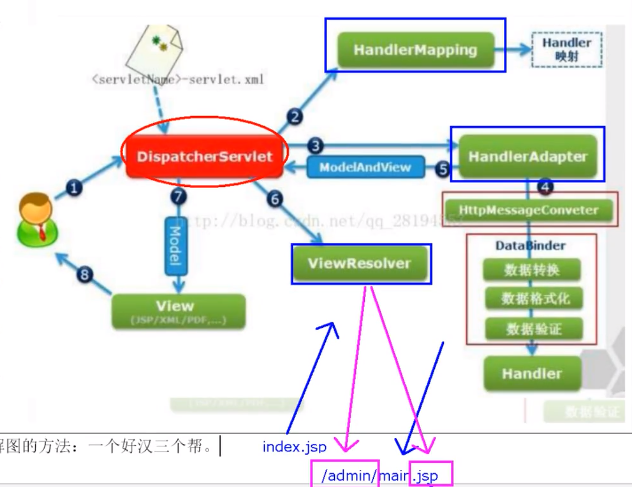
在 web.xml 文件中注册 springmvc 框架(所有 web 请求都是基于 Servlet 的,开发控制器只是一个普通的类)
于是 web 请求执行流程通过核心处理器完成流转
index.jsp <--> DispatcherServlet <--> SpringMVC(普通方法)- DispatcherServlet 要在 web.xml 文件中注册才可用
1
2
3
4
5
6
7
8
9
10
11
12
13
14
15
16
17
18
19
20
21
<?xml version="1.0" encoding="UTF-8"?>
<web-app xmlns="http://xmlns.jcp.org/xml/ns/javaee"
xmlns:xsi="http://www.w3.org/2001/XMLSchema-instance"
xsi:schemaLocation="http://xmlns.jcp.org/xml/ns/javaee http://xmlns.jcp.org/xml/ns/javaee/web-app_4_0.xsd"
version="4.0">
<!-- 注册 SpringMVC 框架 -->
<servlet>
<servlet-name>springmvc</servlet-name>
<servlet-class>org.springframework.web.servlet.DispatcherServlet</servlet-class>
<!-- 初始化 springmvc.xml 到配置文件 -->
<init-param>
<param-name>contextConfigLocation</param-name>
<param-value>classpath:springmvc.xml</param-value>
</init-param>
</servlet>
<servlet-mapping>
<servlet-name>springmvc</servlet-name>
<url-pattern>*.action</url-pattern>
</servlet-mapping>
</web-app>webapp 目录新建
admin - main.jsp,删除并添加新 index.jsp 页面,发送请求给服务器1
2
3
4
5
6
7
8
9
10<%@ page contentType="text/html;charset=UTF-8" language="java" %>
<html>
<head>
<title>index</title>
</head>
<body>
<h1>This is index.jsp</h1>
<a href="${pageContext.request.contextPath}/demo.action"></a>
</body>
</html>开发控制器(Servlet)
1
2
3
4
5
6
7
8
9
10
11
12
13
14
15
16
17
18
19
20
21
22
23
24
25package github.wataaaame.controller;
import org.springframework.stereotype.Controller;
import org.springframework.web.bind.annotation.RequestMapping;
@Controller
public class DemoAction {
/**
* 以前的 Servlet 规范
* protected void doPost(HttpServletRequest request, HttpServletResponse response) throws ServletException, IOException {}
*
* action 中所有的功能实现都是由方法来完成的
* action 方法规范:
* 1. 访问权限是 public
* 2. 方法返回值任意
* 3. 方法名称任意
* 4. 方法可以没有参数,如果有可以是任意类型
* 5. 要使用 @RequestMapping 注解来声明一个访问的路径(名称)
*/
@RequestMapping("/demo")
public String demo() {
System.out.println("服务器被访问");
return "main"; // 可以直接跳转到 /admin/main.jsp 上
}
}- .action 供 DispatcherServlet 核心处理器解析
添加 tomcat 进行功能测试
@RequestMapping 详解
此注解用来映射服务器访问路径
可加在方法上,为此方法注册一个可以访问的名称(路径)
可加在类上,提供一个虚拟路径,以区分不同类中的相同路径,如:@RequestMapping(“/war/demo”)
区分 GET 请求和 POST 请求
1
2
3
4
5
6
7
8
9
10
11
12
13
14
15
16
17
18
19package github.wataaaame.controller;
import org.springframework.stereotype.Controller;
import org.springframework.web.bind.annotation.RequestMapping;
import org.springframework.web.bind.annotation.RequestMethod;
@Controller
public class ReqAction {
@RequestMapping(value = "/req", method = RequestMethod.GET)
public String req() {
System.out.println("I'm do for GET");
return "main";
}
@RequestMapping(value = "/req", method = RequestMethod.POST)
public String reqp() {
System.out.println("I'm do for POST");
return "main";
}
}
五种数据提交方式
散提交数据
只需形参类型与形参名同提交的一致即可
jsp
1
2
3
4
5
6
7
8<h1>单个数据提交</h1>
<form action="${pageContext.request.contextPath}/one.action" method="post">
name: <input type="text" name="name">
<br>
age: <input type="text" name="age">
<br>
<input type="submit">
</form>Controller
1
2
3
4
5
6
7
8@Controller
public class DataSubmitAction {
@RequestMapping("/one")
public String one(String name, int age) {
System.out.println("name="+name+", age="+(age+100));
return "main";
}
}对象封装提交数据
在提交请求中,保证请求参数的名称与实体类中成员变量的名称一致,则可以自动创建并提交数据,自动类型转换,自动封装数据到对象中
1
2
3
4
5@RequestMapping("/two")
public String two(User user) {
System.out.println(user);
return "main";
}动态占位符提交
仅限于超链接或地址栏提交数据,
.action前,一杠一值,用一杠一大括号取(内填 name),使用@PathVariable注解解析(支持解析成不同名字)1
2
3
4
5
6
7
8
9
10
11
12// <h1>3. 动态占位符提交</h1>
// <a href="${pageContext.request.contextPath}/three/vv/12.action">go with vv/12</a>
@RequestMapping("/three/{name}/{uage}")
public String three(
@PathVariable("name")
String name,
@PathVariable("uage")
int age) {
System.out.println(name + " " + age);
return "main";
}映射名称不一致
提交请求参数与 action 方法的形参名不一致,使用注解 @RequestParam 来解析
1
2
3
4
5
6
7
8
9
10@RequestMapping("/four")
public String four(
@RequestParam("name")
String uname,
@RequestParam("age")
int uage
) {
System.out.println("name = " + uname + ", " + "age = " + uage);
return "main";
}手工提取数据
1
2
3
4
5
6
7
8@RequestMapping("/five")
public String five(HttpServletRequest request) {
String name = request.getParameter("name");
int age = Integer.parseInt(request.getParameter("age"));
System.out.println(name + " " + age);
return "main";
}
请求参数中文乱码
配置过滤器,最好放在所有过滤器之前
1 | |
处理方法的返回值
- String:返回客户端资源地址(自动拼接前缀后缀),支持屏蔽自动拼接,从而返回指定路径
- Object:返回 Json 格式对象,使用 Jackson 工具进行转换(需添加依赖),自动将对象或集合转为 Json,一般用于 AJAX 请求
- void:无返回值,一般用于 AJAX 请求
- 8 种基本数据类型:用于 AJAX 请求
- ModelAndView:返回数据和视图对象
AJAX 请求示例
完成 AJAX 请求访问服务器,返回学生集合:
添加 Jackson 依赖
1
2
3
4
5
6<!-- 添加 Jackson 依赖 -->
<dependency>
<groupId>com.fasterxml.jackson.core</groupId>
<artifactId>jackson-databind</artifactId>
<version>2.9.8</version>
</dependency>springmvc.xml 配置文件
1
2
3
4
5<!-- 添加包扫描 -->
<context:component-scan base-package="github.wataaaame.controller"></context:component-scan>
<!-- 不用添加视图解析器,处理的 AJAX 直接原路返回 -->
<!-- 必须添加注解驱动,专门用来处理 AJAX 请求 -->
<mvc:annotation-driven></mvc:annotation-driven><mvc:annotationdriven/>,用来解析 @ResponseBody 注解
在 webapp 目录下新建 js 目录,添加 jQuery 函数库
在 index.jsp 页面导入函数库
1
2
3
4
5
6
7
8
9
10
11
12
13
14
15
16
17
18
19
20
21
22
23
24
25
26
27
28
29
30<%@ page contentType="text/html;charset=UTF-8" language="java" %>
<html>
<head>
<title>AJAX</title>
<script src="js/jquery-3.6.0.js"></script>
</head>
<body>
<script type="text/javascript">
function showStu() {
// 使用 jQuery 封装 AJAX 请求
$.ajax({
url: "${pageContext.request.contextPath}/list.action",
type: "GET",
dataType: "json",
success: function (stuList) {
var html = "";
$.each(stuList, function (i, stu) {
html += stu.name + ", " + stu.age + "<br>";
})
// 回显数据
$("#mydiv").html(html);
}
})
}
</script>
<a href="javascript:showStu()">访问服务器返回学生集合</a><br>
<div id="mydiv">等待服务器返回数据</div>
</body>
</html>在 action 上添加注解 @ResponseBody,用来处理 AJAX 请求
若本类中全都是 AJAX 请求,则类使用 @RestController 注解,方法的 @ResponseBody 可不写
1
2
3
4
5
6
7
8
9
10
11
12
13
14
15
16
17
18
19
20
21
22
23package github.wataaaame.controller;
import github.wataaaame.bean.Student;
import org.springframework.stereotype.Controller;
import org.springframework.web.bind.annotation.RequestMapping;
import org.springframework.web.bind.annotation.ResponseBody;
import java.util.ArrayList;
import java.util.List;
@Controller
public class StuListAction {
@RequestMapping("/list")
@ResponseBody // 解析 AJAX 请求,必须在 springmvc.xml 中添加注册驱动
public List<Student> list() {
List<Student> stuList = new ArrayList<>();
stuList.add(new Student("vv", 22));
stuList.add(new Student("ee", 19));
return stuList;
}
}返回一个集合,SpringMVC 会自动调用 Jackson 转换为 json 格式
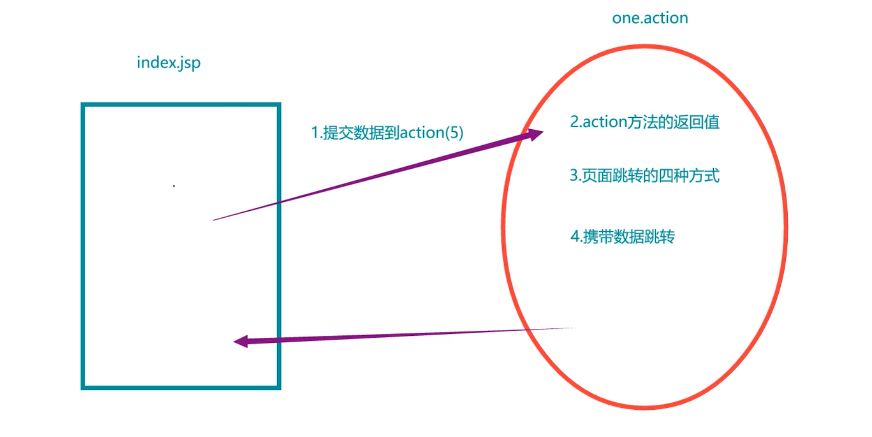
四种跳转方式
index.jsp
1 | |
JumpAction.java
1 | |
默认支持的参数类型
不需要创建,直接添加使用
- HttpServletRequest
- HttpServletResponse
- HttpSession
- Model
- Map
- ModelMap
注意:
- Map、Model、ModelMap 同 Request,使用请求作用域进行数据传递,所以服务器端的跳转必须是请求转发;Session 作用域不受此影响
- Response 不能传递数据
index.jsp
1 | |
DataAction.jsp
1 | |
main.jsp
1 | |
日期处理
日期的提交处理
日期无法在函数的参数中直接提取,需要特殊处理
单个日期处理
在方法参数或 set 方法上使用注解 @DataTimeFormat,此注解必须搭配 springmvc.xml 中的
<mvc:annotationdriver>标签(AJAX 请求同样需要)index.jsp
1
2
3
4
5<%-- 处理日期 --%>
<form action="${pageContext.request.contextPath}/date.action">
<input type="date" name="date">
<input type="submit">
</form>DateAction.java
1
2
3
4
5
6
7
8
9
10
11
12
13
14
15
16
17
18
19
20
21
22package github.wataaaame.controller;
import org.springframework.format.annotation.DateTimeFormat;
import org.springframework.stereotype.Controller;
import org.springframework.web.bind.annotation.RequestMapping;
import java.text.SimpleDateFormat;
import java.util.Date;
@Controller
public class DateAction {
SimpleDateFormat sdf = new SimpleDateFormat("yyyy-MM-dd HH:mm:ss");
@RequestMapping("/date")
public String date(
@DateTimeFormat(pattern = "yyyy-MM-dd")
Date date
) {
System.out.println(sdf.format(date));
return "date";
}
}类中全局日期处理
注册一个注解,用来解析本类中所有日期类型,自动转换
- 注册全局日期注解后无需注册驱动标签
DateAction.java
1
2
3
4
5
6
7
8
9
10
11// 注册一个全局的日期处理注解
@InitBinder
public void initBinder(WebDataBinder webDataBinder) {
webDataBinder.registerCustomEditor(Date.class, new CustomDateEditor(sdf, true));
}
@RequestMapping("/date")
public String date(Date date) {
System.out.println(date);
System.out.println(sdf.format(date));
return "date";
}
日期的显示处理
单个日期对象转换
直接格式化为字符串进行传递显示
1
2// 单个日期传递
request.setAttribute("date", sdf.format(date));List 中实体类对象成员变量的日期转换
添加 JSTL 依赖
1
2
3
4
5
6<!-- JSTL 依赖 -->
<dependency>
<groupId>jstl</groupId>
<artifactId>jstl</artifactId>
<version>1.2</version>
</dependency>使用 JSTL 标签
1
2
3
4
5
6
7
8
9
10
11
12
13
14
15
16
17
18
19
20
21
22
23
24
25
26
27
28
29
30
31
32
33<%--
Created by IntelliJ IDEA.
User: vv
Date: 2022/9/2
Time: 17:11
To change this template use File | Settings | File Templates.
--%>
<%@ page contentType="text/html;charset=UTF-8" language="java" %>
<%-- 导入 JSTL 核心标签库 --%>
<%@ taglib prefix="c" uri="http://java.sun.com/jsp/jstl/core" %>
<%-- 导入 JSTL 格式化标签库 --%>
<%@ taglib prefix="fmt" uri="http://java.sun.com/jsp/jstl/fmt" %>
<html>
<head>
<title>Title</title>
</head>
<body>
<h2>学生集合</h2>
<table width="800px" border="1px">
<tr>
<th>name</th>
<th>birthday</th>
</tr>
<c:forEach items="${stuList}" var="stu">
<tr>
<td>${stu.name}</td>
<td>${stu.birthday}-----<fmt:formatDate value="${stu.birthday}" pattern="yyyy-MM-dd"></fmt:formatDate></td>
</tr>
</c:forEach>
</table>
</body>
</html>
返回为 Json 需要在实体类中的成员变量 get 方法上添加注解
1 | |
mvc:annotation-driven 标签
该标签会自动注册两个 bean,分别为:DefaultAnnotationHandlerMapping 和 AnnotationMethodHandleerAdapter,是 springmvc 为 @controller 分发请求所必需的,除了注册 bean,还提供很多支持:
- 支持使用 ConversionService 实例对表单参数进行类型转换
- 支持使用 @NumberFormat、@DateTimeFormat
- 注解完成数据类型的格式化
- 支持使用 @RequestBody 和 ResponseBody 注解
- 支持使用静态资源的分流
资源在 WEB-INF 下
此目录下的动态资源,不可直接访问,只能通过请求转发的方式进行访问
springmvc.xml
1 | |
WebinfAction.java
1 | |
去掉后缀 action
注册 SpringMVC 框架时修改 url-pattern 标签内容为 /
1 | |
如此则 WEB-INF 下的文件也能被访问,需要设置拦截器以提高安全性
拦截器
针对请求和响应进行的额外处理,在请求和响应的过程中添加预处理,后处理和最终处理
执行时机
preHandle():预处理,请求被处理之前进行操作
返回布尔类型,用于标识是否继续执行
postHandle():请求被处理之后,但结果还没有渲染之前进行操作,可改变响应结果
afterCompletion:最终处理,所有请求响应结束后执行善后工作,清理对象,关闭资源
两种实现方式
- 继承 HandlerInterceptorAdapter 的父类
- 实现 HandlerInterceptor 接口
以第二种方式为例,实现步骤如下:
改造登录方法,在 Session 中存储用户信息,用于进行登录验证
开发拦截器的功能,实现 HandlerInterceptor 接口,重写 preHandle() 方法
1
2
3
4
5
6
7
8
9
10package com.github.wataaaame.crm.workbench.web.controller;
import org.springframework.stereotype.Controller;
import org.springframework.web.bind.annotation.RequestMapping;
@Controller
public class WorkbenchIndexController {
@RequestMapping("/workbench/index")
public String index() { return "workbench/index"; }
}在 springmvc.xml 文件中注册拦截器
注册示例
1
2
3
4
5
6
7
8
9
10
11
12
13<!-- 配置拦截器 -->
<mvc:interceptors>
<mvc:interceptor>
<!-- 配置拦截请求 -->
<mvc:mapping path="/settings/**"/>
<mvc:mapping path="/workbench/**"/>
<!-- 配置拦截白名单 -->
<mvc:exclude-mapping path="/settings/qx/user/toLogin"/>
<mvc:exclude-mapping path="/settings/qx/user/login"/>
<!-- 配置拦截器 bean -->
<bean class="com.github.wataaaame.crm.settings.web.interceptor.LoginInterceptor"></bean>
</mvc:interceptor>
</mvc:interceptors>
SSM 整合
使用 SSM + Vue 整合一个用户表页面
后端 SSM
建库建表
1
2
3
4
5
6
7
8
9
10
11
12
13
14
15
16
17
18
19
20
21create database if not exists ssm default character set utf8;
use ssm;
drop table if exists ssmuser;
create table ssmuser (
user_id varchar(255) not null,
card_type varchar(255) default null,
card_no varchar(255) default null,
user_name varchar(255) default null,
user_sex varchar(255) default null,
user_age varchar(255) default null,
user_role varchar(255) default null,
primary key(user_id) using btree
) engine = innodb character set = utf8;
insert into ssmuser values('101', '身份证', '350201198701146613', '窦民佑', '男', '18', '办事人员和有关人员');
insert into ssmuser values('102', '护照', 'A32532643', '青海霞', '女', '32', '不便分类的其他从业人员');
insert into ssmuser values('103', '身份证', '156323198701146613', '王中言', '男', '53', '农、林、牧、渔、水利业生产人员');
insert into ssmuser values('104', '身份证', '974432198701146613', '方天岚', '男', '48', '未知');
insert into ssmuser values('105', '军官证', '军34829043', '钱好问', '男', '33', '不便分类的其他从业人员');
insert into ssmuser values('106', '身份证', '239834198701146613', '肯迪亚', '女', '23', '未知');新建 Maven 项目,选择 webapp 模板
修改目录
-
pom.xml
jdbc.properties
sqlMapConfig.xml
applicationContext.xml(mapper、service)
springmvc.xml
web.xml
实体类
可以在数据库可视化中,右键选中的表名,点击
Scripted Extensions -> Generate POJOs.Groovy,选择目录后自动生成 bean/pojo 文件,可通过Alt + Ctrl + L修改一下缩进Mapper 层
Service 层
测试
Spring 接管 junit 单元测试
1
2
3
4
5
6
7
8
9@RunWith(SpringJUnit4ClassRunner.class) // 启动 Spring 容器
@ContextConfiguration(locations = {"classpath:applicationContext_mapper.xml", "classpath:applicationContext_service.xml"})
public class MyTest {
@Autowired
UserService userService;
@Test
...
}Controller 层
浏览器测试
前端 Vue
Element 框架实现页面
涉及跨域访问,服务器端 Controller 类上添加 @CrossOrigin 字段以支持跨域访问
后端端口改为 8082(也可更改前端)
安装 nodejs
使当前计算机使用 vue 框架
node-v:查看 node 版本npm -v:查看 npm 版本使用命令行进入到要运行的 vue 项目目录下,运行以下命令进行项目构建:
npm i element -ui -S下载 Element UI 框架
npm install打包项目
npm install --save vue-axios下载跨域访问组件 axios
IDEA 中的
File -> Settings -> Plugins添加 Vue 插件,重启 IDEA启动服务器,新窗口中打开提供的前端项目
点击
Add Configuration...,添加 npmNode interpreter:node.exe 安装路径Scripts(package.json 中规定的当前项目启动方式):选择 dev运行即可
项目分析
config/index.js
1 | |
test/package.json
1 | |
src
1 | |
main.js
1 | |
App.vue
1 | |
UserHome.vue
1 | |